

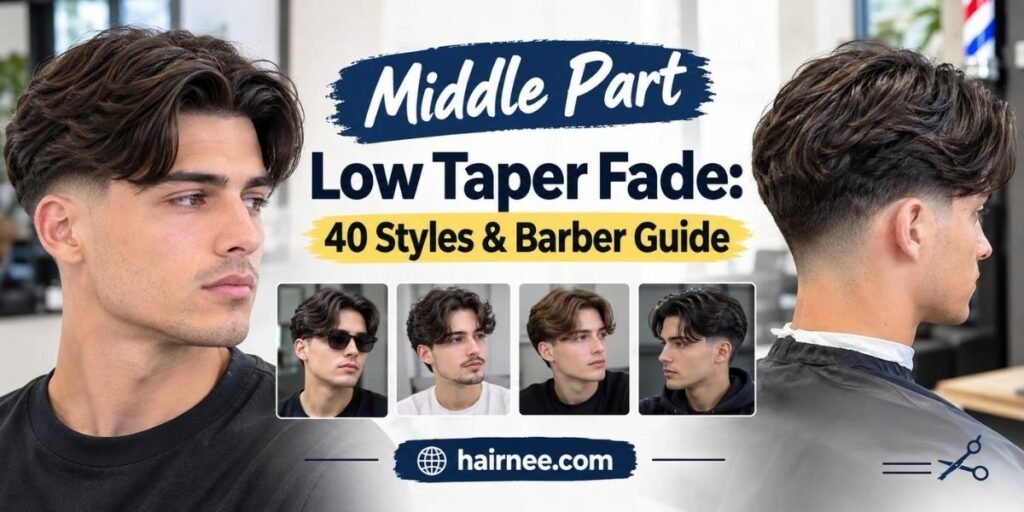
A middle part low taper fade is a center-parted top over sides that fade short from low, near the ears and neckline. It looks neat, feels relaxed, and works on most hair types and face shapes.
This guide gives you 40 styles, copy-paste barber scripts, guard numbers, face-shape tips, and a simple care plan. Read it once and you can walk into any shop and ask with confidence.
What is a middle part low taper fade?
A middle part low taper fade is a haircut with the top split down the center and the sides shortened gradually from a low point near the ears and neckline.
The middle part means your hair falls to both sides, like soft curtains. The low taper means the fade starts low and stays subtle, so the sides look clean but not sharp. A taper shortens hair slowly and shows little skin, while a fade goes closer to the skin, and this cut uses a soft taper with a cleaner finish at the bottom. Pro tip: give your barber two numbers, the top length in inches and the shortest guard at the bottom. It removes most of the guesswork.
| Part of the cut | Typical setting |
| Part | Straight line down the center |
| Top length | About 3 to 4 inches (7.5 to 10 cm) |
| Fade start | Near the ears and neckline |
| Shortest point | Skin, #0.5, or #1 guard |
| Barber visit | Taper every 2 to 4 weeks |
Why it’s popular in 2026
It looks neat but relaxed, it grows out well, and it fits school, work, and weekends. Pro tip: pick this cut if you want a fade without a very sharp look.
The low taper stays close to your natural hairline, so the shape stays soft as it grows. The longer top frames the face on its own, and the cut works with streetwear as easily as with a shirt and tie. The middle part also got a big boost from the 90s style comeback, and social media helped it spread. In real life, many guys ask for it after seeing it on a friend, because it looks easy to wear.
Best face shapes
Oval faces suit it best, but round, square, heart, long, and diamond faces can all wear it with small changes. The part is even on both sides, so the face looks balanced.
Length, volume, and where the taper starts change how the cut looks on each face, so a few small tweaks make it personal. Pro tip: if you are not sure of your face shape, take a straight-on selfie with your hair pulled back and check where your face is widest.
| Face shape | How it looks | Adjustment |
| Oval | Balanced | Wear it as is |
| Round | A flat part can widen the face | Add a little height at the roots |
| Square | The soft top eases a strong jaw | Keep the sides clean |
| Heart | Narrow chin | Keep some width at the temples, not too sleek |
| Long | Extra height makes the face longer | Shorter top, tight low taper |
| Diamond | Wide cheekbones | Keep the top soft, add a little fringe |
How it looks on straight, wavy, and curly hair
On straight hair it looks sleek, on wavy hair it looks relaxed, and on curly hair it looks full and bold. Texture changes both the look and the styling effort.
The cut works on all three, but the part line, the product, and the drying method change with each one. Pro tip: style your hair the way it grows, not against it. A cut that fights your natural texture takes twice as long every morning.
| Hair type | Look | Daily effort |
| Straight | Crisp part, flat and even sides | Low |
| Wavy | Soft flow with movement | Low to medium |
| Curly | Big volume with clean sides | Medium |
| Thick | Strong shape, needs weight removed | Medium |
| Fine or thin | Soft, light, needs lift | Medium |
Straight hair
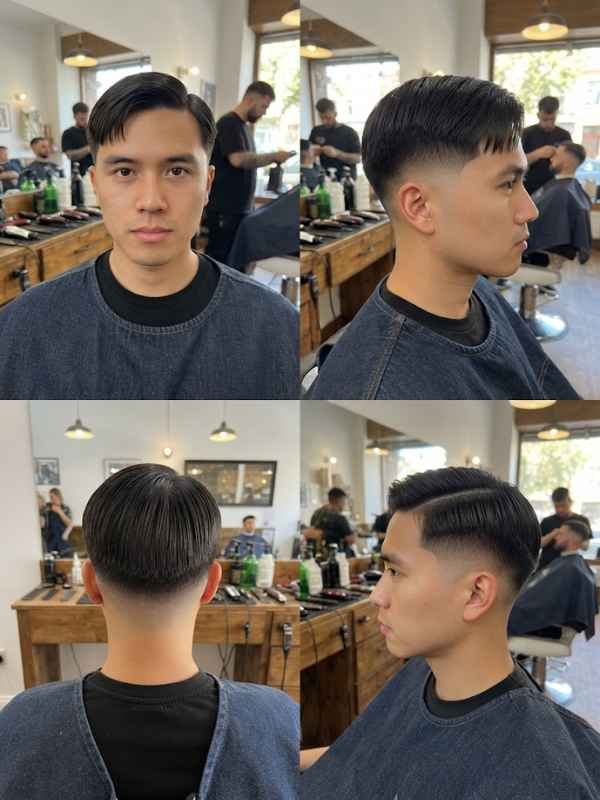
Straight hair gives the cleanest middle part. The line stays sharp and the top falls flat on both sides with little effort. Pro tip: blow-dry on low heat and push the hair away from the part with a comb before it dries.
A light pomade or matte clay on slightly damp hair keeps the line neat without a greasy look. Straight hair also shows mistakes, so a crooked part is easy to spot. In real shops, a good barber often marks the part with the tail of a comb before cutting.
Wavy hair
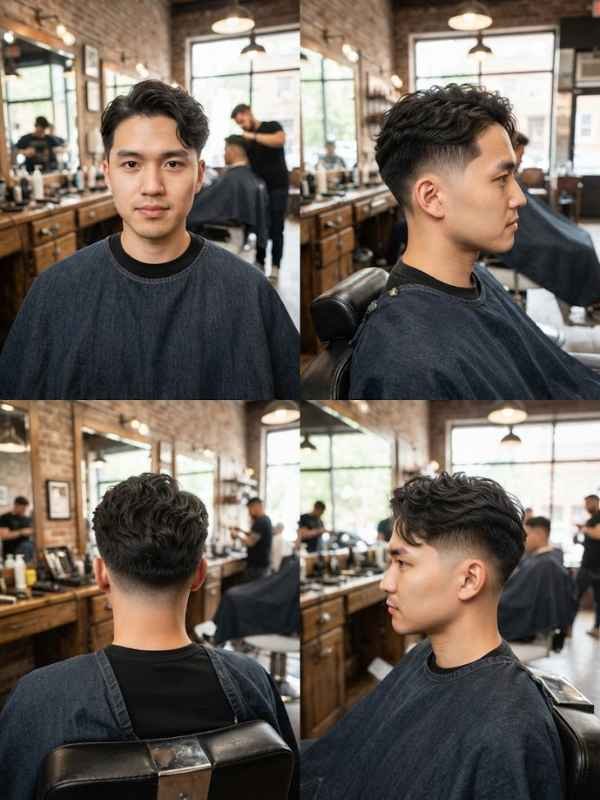
Wavy hair gives a relaxed, lived-in finish and needs less product than most people think. The natural bend adds movement that suits the style.
Use sea salt spray or a light texture spray on damp hair, then air-dry or shape it with your fingers. Skip heavy creams, because they flatten waves. Pro tip: let the hair dry about halfway before you touch it. Handling wet waves too much leads to frizz.
Curly hair
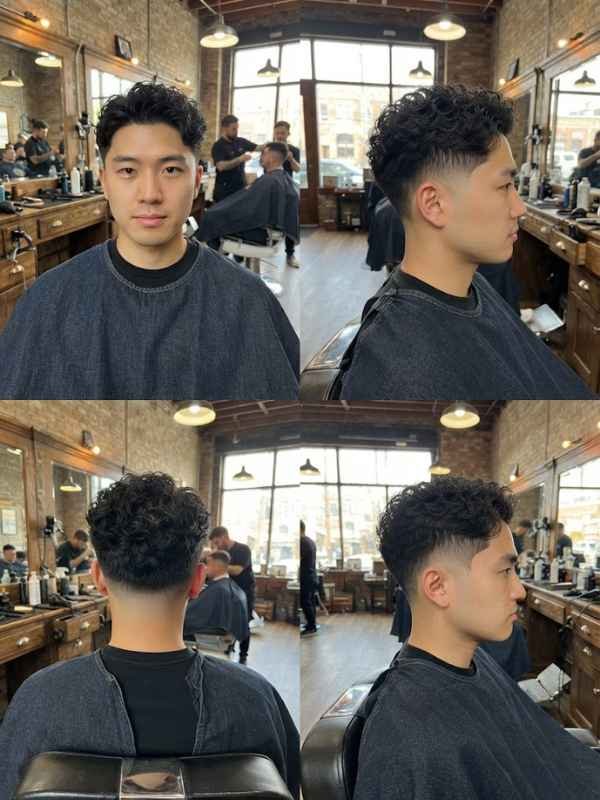
Curly hair adds the most shape. The curls build volume on top that looks great next to clean, faded sides. Pro tip: never brush curls when they are dry, because it breaks the pattern and makes frizz.
Apply a curl-defining cream to very wet hair, then let it air-dry or use a diffuser (a dryer attachment that spreads the air gently). Curls shrink when they dry, so a top that looks long when wet can end up shorter. Ask your barber to cut curly hair dry or leave a little extra length so the part still falls on both sides.
Also Read This Best 3B Hairstyles for Men: 24 Curly Cuts & Barber Tips
Thick hair
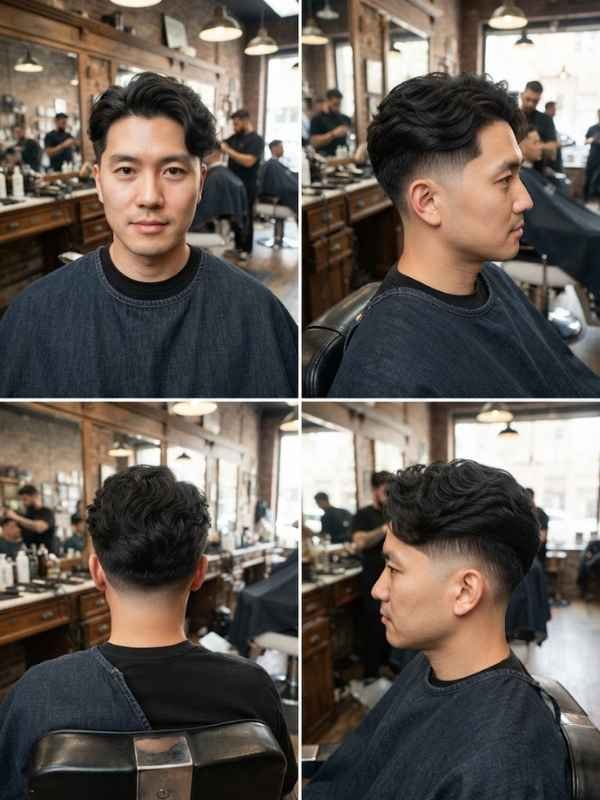
Thick hair suits the cut, but it needs some weight taken out so the top does not sit like a heavy block.
Ask your barber to point cut or add light layers so it moves and lies flat. Point cutting means cutting small notches into the ends. It makes the top softer without making it short. Pro tip: if your hair puffs out at the sides after a few weeks, ask for a slightly tighter taper above the ears, not a shorter top.
Fine or thin hair
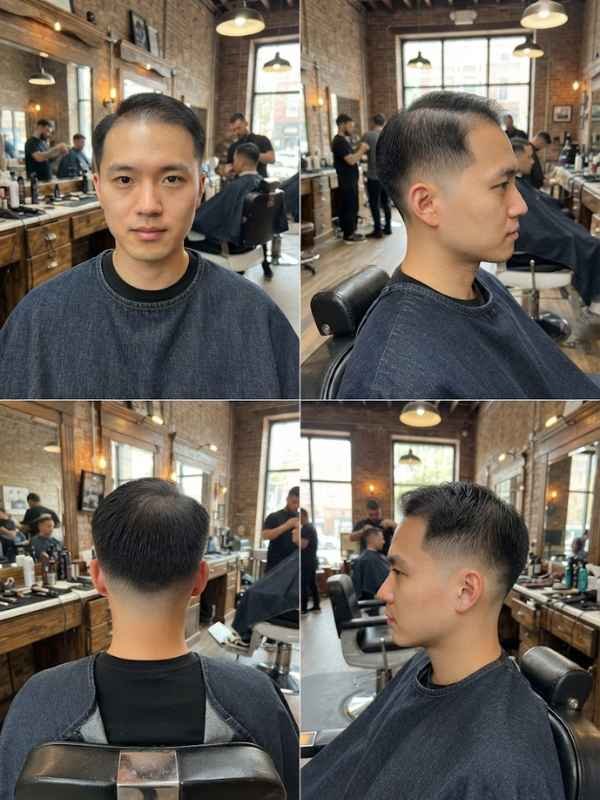
Fine hair can wear this cut, but too much length can make it look flat instead of full. Pro tip: keep the top short to medium and use a light volumizing mousse or powder, not heavy pomade.
Heavy products pull fine hair down and make the part split in an ugly way. Less product, spread evenly, almost always works better. A tighter low taper also makes the top look fuller by creating a clear difference between the top and the sides.
Which hairlines, cowlicks, and growth patterns make a middle part harder?
Cowlicks, a receding hairline, and a strong natural side part make the middle part harder. They are not deal-breakers, because a good barber can plan around them.
A middle part puts the hairline in the spotlight, so any uneven growth at the front shows. Pro tip: tell your barber about your cowlick before the first cut, and ask them to check how your hair falls when it is dry.
- Front cowlick: leave more length and style the hair with the part, not against it.
- Receding corners: keep the top soft and a little longer at the sides so the hairline is less sharp.
- Strong natural side part: train the hair with a blow-dryer for a few weeks, or move the part a little off-center.
- Double crown: keep the top longer so the swirl does not stick up.
- Widow’s peak: the middle part can show it off, so keep the front clean.
Choosing the right top length
Aim for about 3 to 4 inches on top. That length is long enough to part cleanly and fall on both sides, but short enough to style quickly. Pro tip: bring a photo or show the length with your fingers, since “medium length” means something different to every barber.
If the top is too short, the hair stands up instead of lying down. Match the length to your hair density too, because thicker hair can carry more length, while finer hair often looks better shorter. The sides should stay clean, but they do not need to be very short, because the low taper works best when it supports the top. In real life, most barbers cut a little shorter than you picture, so say “leave it longer” out loud.
| Length | Size | Look | Effort |
| Short | 2 to 3 in | Subtle part, little styling | Low |
| Medium | 3 to 4 in | Clean part with movement, most popular | Medium |
| Long | 4 in or more | Real curtain effect, side-swept | High |
How to ask your barber
Say “middle part low taper fade,” then give four details: part, top length, taper height, and bottom finish. Barbers work better with clear numbers than with “something low-key.”
In real shops, a photo and two numbers do more than five minutes of talking. Here is a script you can copy: “I want a middle part with about three to four inches on top, enough to style on both sides. Start the taper low around the ears and neckline, finish at a #1 guard, and blend it smoothly into the top.” Pro tip: keep this script in your notes app or send it to the shop before you go, and bring a photo.
- Part: say “middle part,” and add “split down the center.”
- Top length: give inches or point to a photo.
- Taper height: say “low, around the ears and neckline.”
- Bottom finish: skin, #0.5, or #1 guard.
- For wavy or curly hair, add: “Cut it dry and keep it a little longer so the part falls well.”
- For thick Asian hair, add: “Remove some weight with point cutting so it does not sit heavy.”
Which clipper guards and measurements does a low taper use?
A low taper usually starts at a #0 to #1 guard at the bottom and blends up through #2 and #3 near the top of the ears. Pro tip: if your barber uses a different system, ask “what is the shortest length at the bottom in millimeters?” and compare it with the table.
Guard sizes can vary a little between brands, so use this chart as a guide. A low taper stays under the ear line, so you will usually only use two or three guards, and the top then blends into 3 to 4 inches of length.
| Guard | Length (mm) | Length (inch) | Where it is used |
| No guard (#0) | About 0 | About 0 | Skin finish at the neckline and ears |
| #0.5 | 1.5 | 1/16 | Soft shadow finish |
| #1 | 3 | 1/8 | Short taper bottom |
| #2 | 6 | 1/4 | First blend step |
| #3 | 10 | 3/8 | Blend near the top of the ear |
| #4 | 13 | 1/2 | Blend into the top, only if you want it fuller |
Low taper vs mid taper fade
The difference is where the fade starts. A low taper starts near the ears and neckline, and a mid taper starts around the middle of the sides, so the mid taper looks sharper.
A low taper is softer, grows out better, and needs fewer touch-ups. A mid taper gives a sharper, neater look, but it needs more regular care. Pro tip: if you are new to fades, start with the low taper. You can always go higher next time, but you cannot put hair back.
| Low taper | Mid taper | |
| Fade starts | Near the ears and neckline | Around the middle of the sides |
| Sharpness | Soft, natural | Sharper, more defined |
| Feel | Relaxed, low-key | Neat, bold |
| Grow-out | Gentle | Shows lines faster |
| Best for | School, everyday wear | Office, bolder look |
Middle part vs side part low taper fade: which is better?
A middle part looks balanced and casual, and a side part looks classic and sharp. Neither is better, so pick the one that fits your face and your hairline. Pro tip: try both with a comb at home first, and look at yourself in the mirror for a minute each way.
The middle part works best on hair that falls evenly on both sides, and it flatters oval, square, and heart faces. A side part works better if you have a strong natural side part or a cowlick at the front. The low taper stays the same in both cases.
| Middle part | Side part | |
| Look | Balanced, relaxed | Classic, neat |
| Face fit | Oval, square, heart | Round, long, uneven hairline |
| Styling | Needs even hair growth | Works with a natural part |
| Vibe | Casual, modern | Smart, traditional |
Is a middle part low taper fade professional enough for work or school?
Yes, in most offices and schools, if you keep the top neat and the taper soft. Always check your own dress code first.
The low taper is one of the more work-friendly fades because it is subtle and grows out well. A shorter top, a #1 or #2 finish, and a clean part keep it neat. Pro tip: for a safe version, ask for “a soft low taper with the top about three inches, no shaved designs.”
Styling products that work
Pick the product by your hair type, not by the cut. A light cream suits most people, and heavy pomade is rarely the right choice. Pro tip: buy a small size first, because a product that feels good in the store can feel greasy or crunchy on your own hair.
Use only a small amount and spread it evenly through damp or dry hair. If your hair is fine, skip greasy products, because they pull the top down and split the part. In real life, most guys use too much product and not enough comb.
| Product | Best for | Finish |
| Lightweight cream | Normal or wavy hair | Natural, flowy |
| Sea salt spray | Wavy or straight hair | Textured, tousled |
| Matte clay | Straight or thick hair | Hold without shine |
| Water-based pomade | Straight hair | Clean, defined part |
| Mousse | Fine hair, curls | Volume without weight |
| Curl cream | Curly or coily hair | Defined curls |
How to style it at home
Towel-dry your hair until it is damp, split the part, blow-dry the sides away from the part, and add a little product. The whole routine takes about five minutes.
- Towel-dry until the hair is damp, not soaking. Product spreads more evenly this way.
- Split the part down the center with the tail of a comb, from the hairline back.
- Blow-dry both sides away from the part on low to medium heat so the hair learns to fall that way.
- Add product: work a small amount of cream, clay, or pomade through with your fingers.
- Finish with your fingers or a wide-tooth comb. A fine comb makes the top look too neat.
- Keep it relaxed. You want a lived-in look, not a helmet.
Pro tip: if the part will not stay in place, blow-dry the roots in the opposite direction first, then push them back. Straight hair mostly needs good drying, wavy hair needs partial air-drying before spray, and curly hair is best styled wet and then left alone.
How often to maintain it
Clean up the taper every 2 to 4 weeks and trim the top every 6 to 8 weeks. Pro tip: book your next visit before you leave the chair, because the good slots go fast.
Hair grows about half an inch a month, according to the American Academy of Dermatology, so the neckline and sideburns blur first. The low taper grows out better than a high fade, but it still needs care or the line between the taper and the top gets lost. A quick trim of stray neck hair at home helps until the next visit.
| Time | What you see |
| Week 1 | Sharp taper and clean part |
| Week 2 | Still tidy, neckline slightly soft |
| Week 3 to 4 | Taper starts to blur, sideburns grow out |
| Week 6 to 8 | Top needs a trim, the part falls unevenly |
What are the common mistakes with a middle part low taper fade?
The most common mistakes are cutting the top too short, asking for a taper that is too high, and using too much product. Most of them come from unclear instructions. Pro tip: bring a photo and point to the exact length and taper height you want.
Small errors show more on this cut because the part makes everything look even. In real life, the crooked part is the most common complaint, and it is easy to avoid. The table shows the usual slips and how to fix them.
| Mistake | What goes wrong | Fix |
| Top too short | Hair stands up and will not part | Keep at least 3 inches |
| Taper too high | Looks like a mid taper, less soft | Say “low, around the ears” |
| Too much product | Part looks greasy and flat | Use a pea-sized amount |
| Crooked part | Looks uneven, especially on straight hair | Ask the barber to mark the part |
| Skipping touch-ups | Taper blurs into the top | Visit every 2 to 4 weeks |
| Brushing curls dry | Frizz and broken shape | Style curls wet |
Variations to try
Here are 40 middle part low taper fade variations, from the classic cut to bold changes in the part, the top, the color, and the fade finish. Pro tip: pick one or two changes at a time, because too many changes in one cut are hard to repeat at home.
Small changes give you very different looks, so match the style to your hair texture and the time you want to spend on it. The six styles below are the base looks, and the longer table after them adds 33 more. The Asian hair version, covered near the end, makes the 40th.
Also Read This Best 3B Hairstyles for Men: 24 Curly Cuts & Barber Tips
Classic
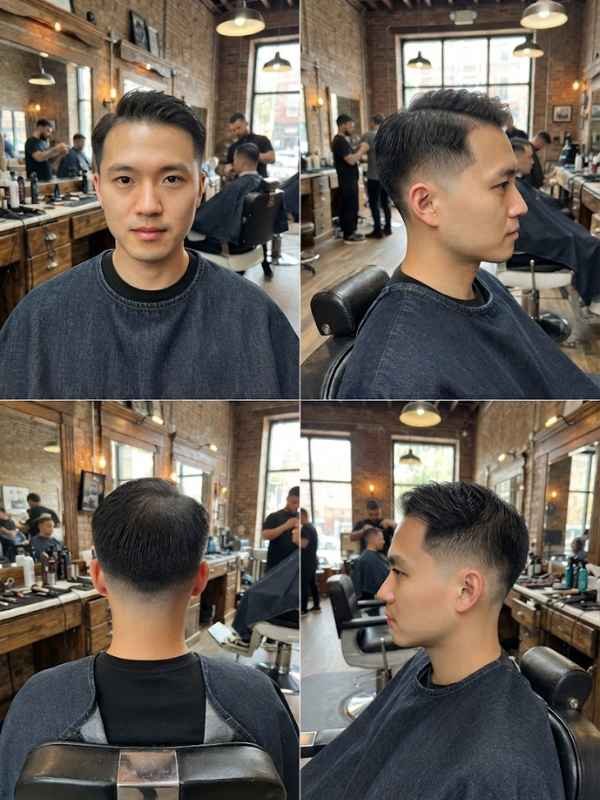
A classic middle part low taper fade has a clean, even part, a medium top of 3 to 4 inches, and a soft taper. It suits straight to slightly wavy hair in almost any setting.
It is the safest choice if this is your first time. Pro tip: ask for a quick part check at the end of the cut. A barber can fix a crooked part in seconds.
Textured
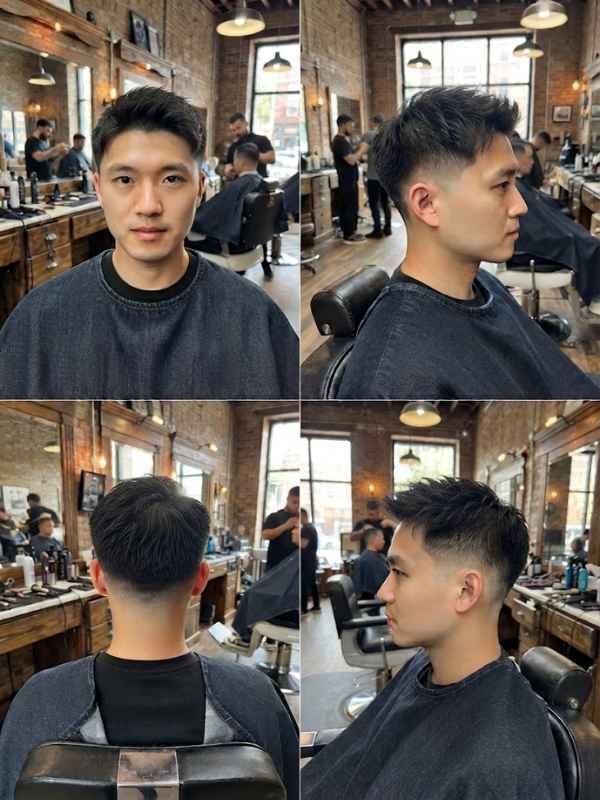
A textured version has a choppy, piece-y top with more movement and a lived-in feel. Pro tip: use sea salt spray on damp hair and scrunch it lightly with your fingers.
Textured tops forgive a few extra days of growth, so they suit busy people. The barber point cuts the ends to create the broken look, and the low taper keeps the sides tidy.
Curly top
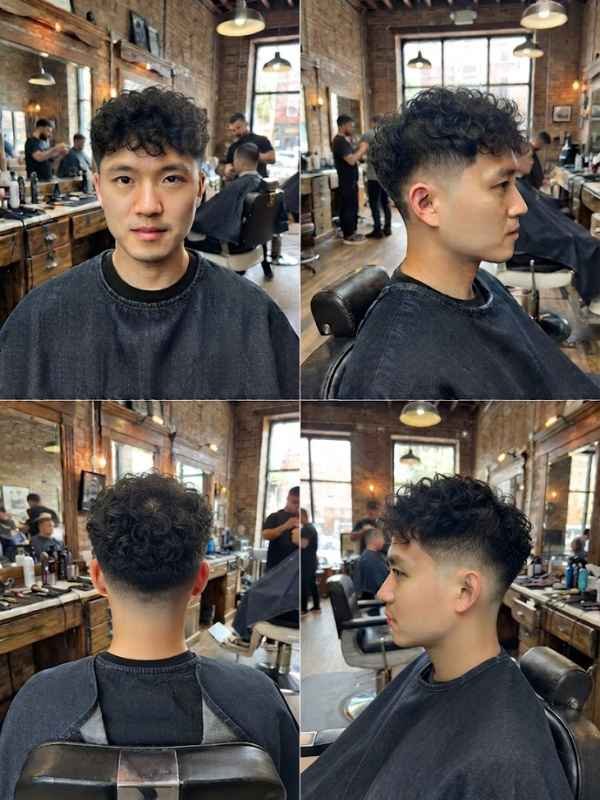
The curly top lets your curls take over while the sides stay clean. It is the boldest version of the cut.
Curls need more length to show their shape, so aim for at least 3 to 4 inches. Pro tip: ask for the fade to be cut dry, or at least checked dry, because curls shrink and a wet cut can end up shorter than planned.
Wavy curtain
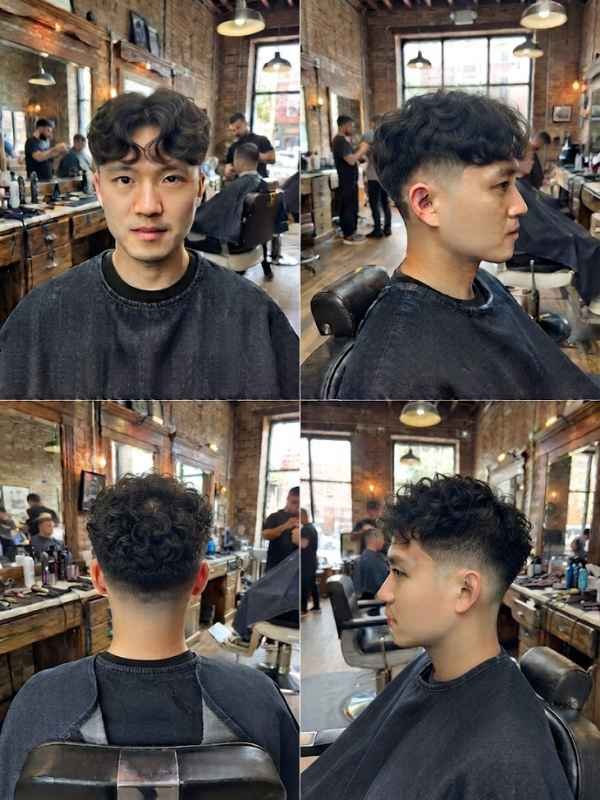
The wavy curtain runs the top longer, with clear waves that fall on both sides of the part. Pro tip: let the hair air-dry about halfway and then style it, because it keeps the waves from turning into frizz.
This version suits wavy hair that holds its shape. It needs a longer top of 4 inches or more, so plan for more frequent styling and regular trims to avoid a heavy, shapeless look.
Longer fringe
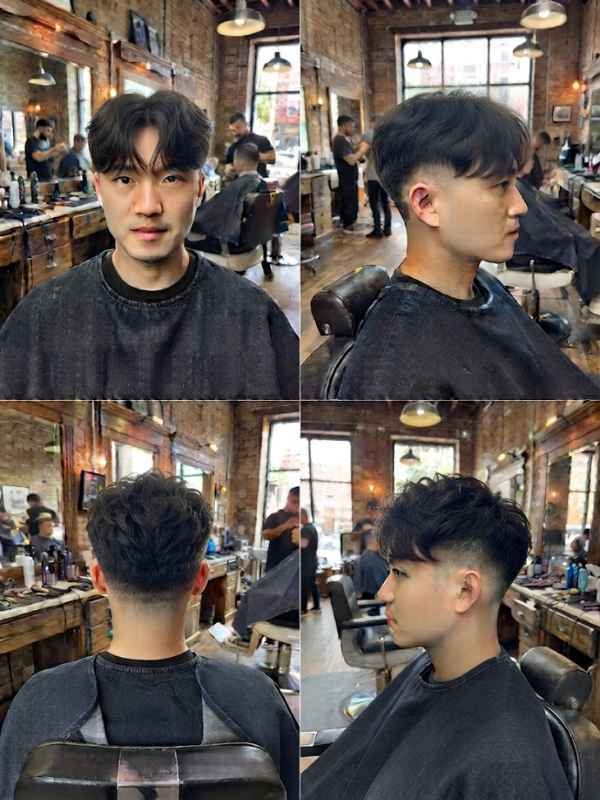
A longer fringe means extra length at the front, near the eyebrows, for a soft, face-framing effect. It works well on round and square faces.
The fringe softens the forehead and gives the part more weight. Pro tip: keep the fringe slightly above the eyes, not over them. Hair in your eyes gets annoying fast, and it looks messy by midday.
Subtle skin finish
A subtle skin finish adds a touch of bare skin right at the bottom of the taper. It gives a stronger look while keeping the low placement.
It looks sharp, but it shows regrowth sooner than a #1 finish. Pro tip: if you get razor bumps, ask for a #0.5 or #1 guard instead of skin.
More middle part low taper fade variations to try
Here are 33 more variations beyond the base styles. Each one changes something real: the fade finish, the part, the top, the hair need, the color, or the occasion.
Bring photos for the ones you like. Pro tip: do not mix more than two big changes in one visit, because a hard part, a mullet flow, and a shaved design together are hard to repeat at home.
| # | Variation | What changes | Best for |
| 1 | Shadow taper (#1) middle part | Taper stops at a #1 guard, no skin | Sensitive skin, office |
| 2 | Low burst taper middle part | Fade curves around the ear | Curly or wavy tops |
| 3 | Low drop taper middle part | Fade line drops down behind the ear | Extra shape from the side |
| 4 | Natural-neckline taper | Neckline left soft and natural | Low upkeep |
| 5 | Blocked-neckline taper | Squared neckline at the back | Neat back view |
| 6 | Beard-blend low taper | Taper joins the beard line | Men with beards |
| 7 | Hard-part middle part | Razor-shaved part line | Sharp, defined look |
| 8 | Natural loose part | No hard line, hair falls naturally | Relaxed style |
| 9 | Heavy curtain split | Long, full curtains on both sides | Thick hair |
| 10 | Pushed-back middle part | Hair swept back from the part | Flow and volume |
| 11 | Messy zig-zag part | Uneven, casual part line | Textured, casual look |
| 12 | Widow’s peak part | Part shows off the peak | Strong hairlines |
| 13 | Cropped short middle part | Top 2 to 3 inches | Low effort |
| 14 | Layered flow | Light layers for movement | Straight or wavy hair |
| 15 | Shaggy layers | Choppy, rough layers | Wavy hair, relaxed style |
| 16 | Short-tail mullet flow | Back kept a little longer | Creative, bold style |
| 17 | Korean two-block part | Longer top, short sides | Thick, straight hair |
| 18 | Lifted-root volume | Roots dried up and away | Flat or fine hair |
| 19 | Slicked wet-look part | Combed with wet-look product | Dressy events |
| 20 | Loose-curl middle part | Soft curls, easy part | Loose curls |
| 21 | Coily middle part | Defined coils, parted by hand | Coily hair |
| 22 | Wavy shag | Layered waves, soft part | Wavy hair |
| 23 | Thin-hair volume | Shorter top, mousse for lift | Fine or thin hair |
| 24 | Thinning-crown layered | Layers cover a thin crown | Crown thinning |
| 25 | Bleached blonde | Light color on top | Short tops, strong look |
| 26 | Dark natural brown | Natural color, glossy finish | Clean, classic look |
| 27 | Subtle highlights | Soft highlights on the curtains | Adds depth |
| 28 | Silver or grey | Grey tone on top | Modern, light look |
| 29 | Shaved design at the taper | Small line or design on the side | Personal detail |
| 30 | Office-ready sleek | Neat part, #1 taper, light product | Work |
| 31 | School-safe soft | Soft taper, no designs | Strict dress codes |
| 32 | Formal slick | Combed back neatly, clean finish | Weddings and events |
| 33 | Gym-friendly tucked back | Curtains tucked behind the ears | Sports, active days |
Textured Middle Part Low Taper Fade
A textured middle part low taper fade has a choppy, layered top, a center part, and a soft low taper.
This is the full guide, so you can ask for it with the right details. To get the texture, the barber point cuts the top and adds light layers, and you finish it with sea salt spray or texture powder. Pro tip: use a hair dryer first, then add the product, because texture products work best on dry hair that already has some shape.
- Ask for: point cutting and light layers on a 3 to 4 inch top.
- Dry: blow-dry on low heat, pushing the hair away from the part.
- Style: a small amount of sea salt spray or texture powder, scrunched with your fingers.
- Avoid: heavy pomade, because it clumps the texture together.
Middle part low taper fade Asian
For many men with straight, thick hair, common in East and Southeast Asian hair types, this cut works well with a few changes.
Every head is different, so use this as a guide, not a rule. Straight, thick hair is heavy, so it tends to fall flat at the part and stick out at the sides. Ask your barber to remove weight with point cutting and layers, and keep the top at about 3 to 4 inches. Pro tip: blow-dry the roots up and away from the part before you add any product. It stops the part from flopping down by lunchtime.
| Concern | What to do |
| Heavy, flat top | Ask for point cutting and light layers |
| Hair sticks out at the sides | Tighter low taper above the ears |
| Part falls flat | Blow-dry roots up and away from the part |
| Sharp regrowth line | Use a #1 finish instead of skin |
| Very straight, dark hair | Matte clay, small amount |
Summary
A middle part low taper fade gives you a neat, relaxed look with a soft fade and a centered part. Pick the top length, taper finish, and part style that fit your hair.
- The center part and the low fade are what define the cut.
- Aim for about 3 to 4 inches on top so the part falls on both sides.
- Ask for the taper to start low, around the ears and neckline, with a #0 to #1 finish.
- Match the product to your hair type, and use less than you think you need.
- Clean up the taper every 2 to 4 weeks and trim the top every 6 to 8 weeks.
- Bring a photo and use the script, so your barber knows exactly what you want.
Frequently Asked Questions
What is a middle part low taper fade?
It is a haircut with the top split down the center and the sides faded short from a low point near the ears and neckline. It looks neat and relaxed.
How long should my hair be for a middle part low taper fade?
About 3 to 4 inches on top works for most people. Shorter hair gives a subtle part, and longer hair gives a fuller curtain look.
Is a low taper fade professional?
Yes. The low taper is one of the more work-friendly fades because it is subtle and grows out well. It avoids the very sharp look that can feel too casual.
How often should I get a low taper touched up?
Most people clean up the taper every 2 to 4 weeks and trim the top every 6 to 8 weeks. That keeps the shape sharp.
Does a middle part low taper fade work on thin hair?
Yes. Keep the top short to medium and use a light mousse or powder. Heavy pomade pulls fine hair down.
Can curly hair get a middle part low taper fade?
Yes. Keep the top at least 3 to 4 inches and style it wet with a curl cream. Plan for curl shrinkage when you choose the length.
What is the difference between a low taper and a mid taper?
A low taper starts near the ears and neckline and looks softer. A mid taper starts around the middle of the sides and looks sharper.
Does a middle part low taper fade suit straight Asian hair?
Yes, with small changes. Ask for point cutting and layers to remove weight, and blow-dry the roots up and away from the part.
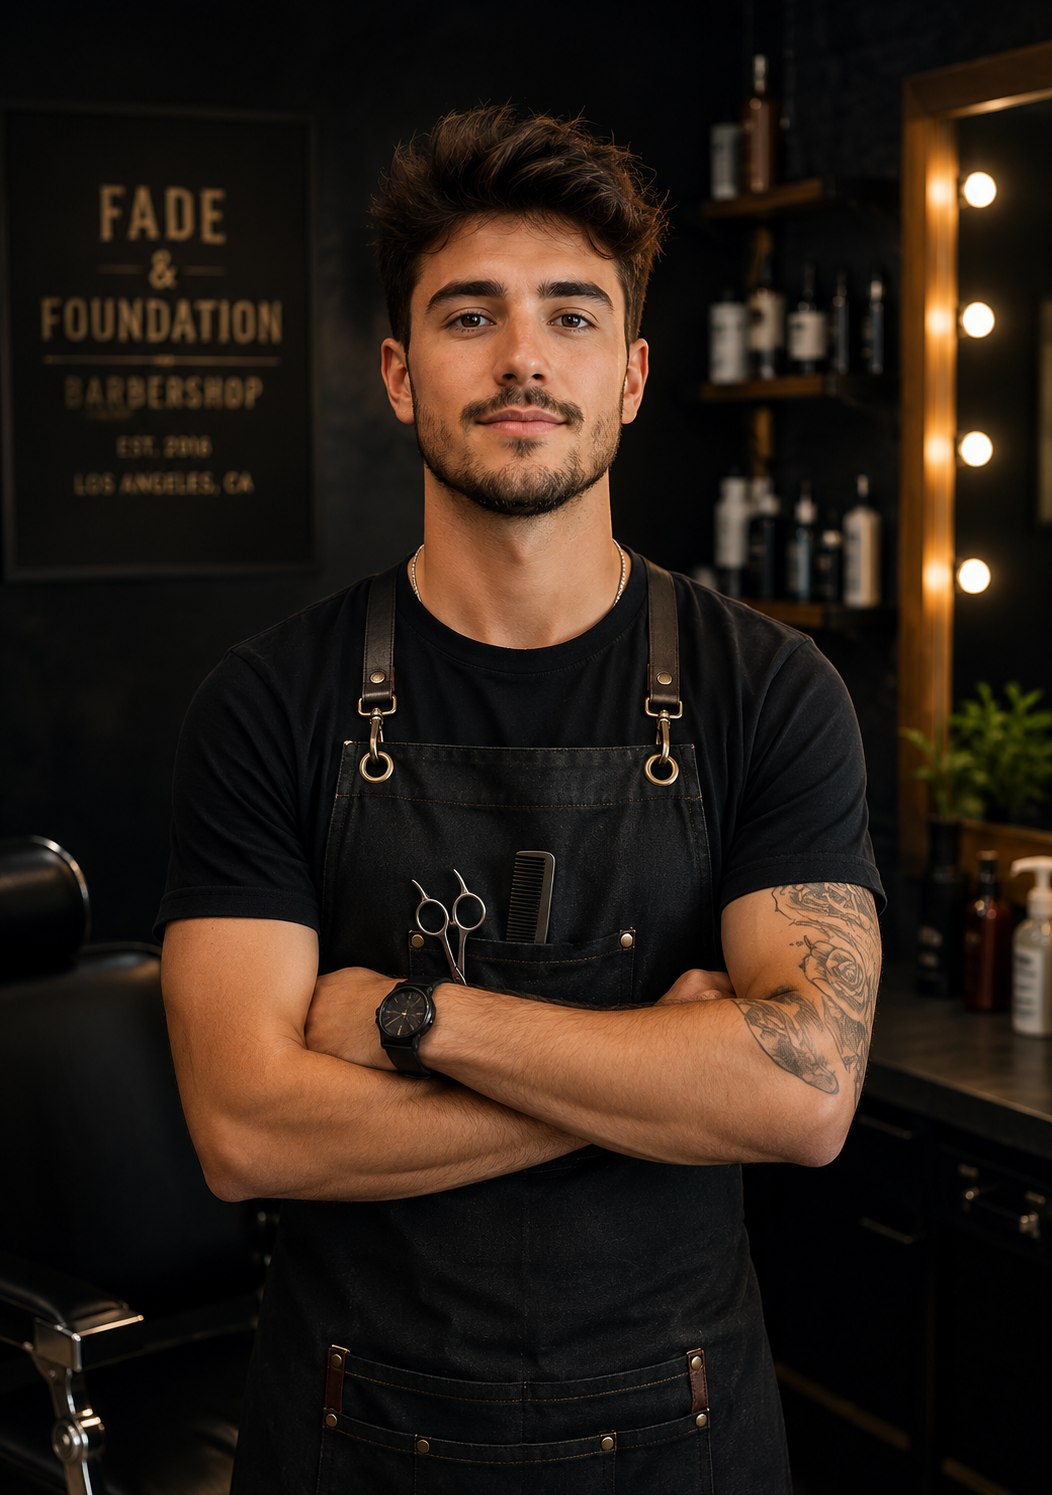
Hi, I’m Jake Miller a passionate barber based in Los Angeles, California, with over 3 years of hands-on experience in the craft. I specialize in modern fades, clean cuts, precision beard grooming, and classic barbering techniques, blending sharp technical skill with a relaxed, personal touch.
Over these years, I’ve had the opportunity to work with all kinds of clients, each with their own style and personality and that’s exactly what I love about this craft. For me, it’s never just about a haircut. It’s about understanding who you are and bringing that out through precision and care.
Every client who sits in my chair gets my full attention and expertise, because I believe great barbering is where confidence meets individuality. My goal is simple: to make sure you walk out looking sharp and feeling like the best version of yourself.

1 thought on “Middle Part Low Taper Fade: 40 Styles & Barber Guide”